Wednesday, December 7, 2016

Old Music Cabinet Meets Mackenzie Childs

So my friend had this awesome old music chest.  And it was as cute as can be, but no one in her family wanted it.  It was brown and just kind of melted into the background when placed in a room.  
With a piece like this, there are all kinds of choices you can make.  But if you really want a "wow" piece, you do something fun with it.  In this case we decided to "check and stripe it up".   Starting with some muted checks on the side...(sprawled out on the floor...that's how i work) I begin to work on its transformation. 
And more checks...
And then I try to work in colors that match my friends room and add the little details that make the piece pop. This piece took a lot of work, but really turned out fun and very funky.  But it totally works!

My friend finished this piece with some real MC knobs.  Here is the old music chest in all her checkered glory.    

I'm so lucky to have friends that trust me with their furniture and allow me to creatively transform their pieces.  

Hope you are having a great week!

Paula


Tuesday, November 29, 2016

Lovely Little French Chair

Ok....this chair doesn't look so great now right?  My neighbor was going to throw away this chair. He thought it was ugly.  But look at it - it has great bones!  Great details, a cane back, cute curves...and so easy to re-do!
Now, you can take this chair to be professionally reupholstered and it would be beautiful.  But, you can also re-do this yourself and have a great outcome. Don't be intimidated, just start taking it apart and save the material as your pattern. With the burgundy velvet off, look how great this chair looks.  It actually looks so much better with the material off which is why you need to look at the form of an old chair and not the material. Now you can see the details and the wood and know that this has so much potential.
With Annie Sloan chalk paint, you don't have to strip and sand the wood on finished furniture, which... would be kind of a pain. You just paint right on it - which makes this super easy.  So I gave this a coat of Old White, which is a soft cream and then added some french linen.  Nothing has to be perfect - unless you want it to be. I just swirl it around, wipe some off, add more back on, until it looks how I want it to look.
Then I added some gold gilding to highlight and accent.  

 I originally thought I'd leave the cane brown, but ended up thinking it looked prettier painted.  When painting cane, use a very little bit of paint on your brush and make sure no drips come through the back.

People tell me all the time, "I could never do this....I'll mess it up."  That's ok....I mess up all the time and sometimes, when you mess up - you get an even better result.  Take this next step for instance... Since the chair pad had all these curves, I opted to get the removable pad, professionally done.  I chose to do the chair portion - myself.  This isn't hard to do, but you do have to pay attention - which on this chair - I did not.  If you look closely at that right arm at the bottom, I cut the material too short (always go bigger first). And of course, I did not have any extra material. Knowing I could not leave the chair this like this (I'm a little OCD)  I went out and bought some new fabric and used a different fabric on the bottom to go with the top cushion.
I found a beautiful new material that worked out great.  Truth be told, I actually like the two different patterns together better and the chair took on a new personality with the difference.
How fun is this?  So don't be afraid to try something for fear of messing up.  If you mess up, try something else.  :)
I love my new little chair.  It makes me happy!

Do you have an old chair sitting around....give it a makeover.  It's easy.

Have a great week!

Paula


Monday, November 21, 2016

My Daughter's Mackenzie-Child's Like End Table

After seeing a sweet little table I did for a friend, my daughter asked me to paint an end table for her that looked like a Mackenzie-Child's piece.  She had a sentimental end table of my grandfather's and with the cute little lines I thought this would be perfect.  

This was my original inspiration.
The black and white stripes gave it an immediate "wow" factor and the more I worked on this, the more fun I had with it. 
Next I worked on checking the back legs and then adding some stripes and color.  
The inspiration piece I used had a crackled front and I wanted to do the same. I created this crackle look using regular craft glue.  Yep, regular old Elmer's will work. 
See it all starting to come together?  
Finished up with some additional details and then a nice coat of poly.  

Hope she likes it. :)

Have a great week!

Paula


Friday, November 11, 2016

Jingle Bells.....

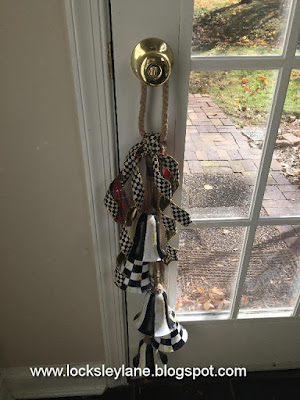
I know it's not even Thanksgiving yet, but I found these super cute silver bells and thought a little paint would brighten them up.  Remember, if you find things you like, but the colors don't work for you....you can always paint them.
 At my little workspace below - (yes, that's my newly painted dining room table....) you can see how I work on things.
With a little black and white paint and some Mackenzie-Child's ribbon, the options are endless!


Start working on your holiday projects...the holidays will be upon us in no time!  

Have a great weekend!

Paula


Friday, October 28, 2016

Re-upholstering Dining Room Chairs

Awhile back, I repainted an old queen anne cherry table and chair set.  It was the first few pieces of furniture my husband and I bought when we were married.
I painted the table in a cocoa color with cream chairs and a cocoa wash.  I finished it with some gold gilding around the edges.  You can see the whole post here.   It came out super pretty but the chair pads needed a makeover of their own.
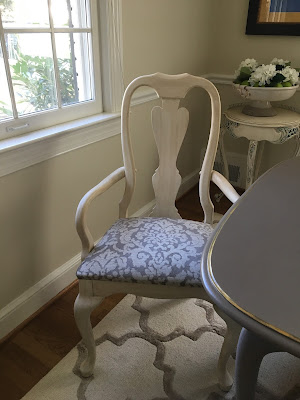
Thanks to my super talented home design friend, I picked out a beautiful cream and taupe pattern that goes perfectly while adding texture and sophistication to the room.  All chair pads unscrew from underneath and you can use the old fabric as your pattern on your new fabric.  
Above is before......and below is after.  
The lighting in these pictures isn't great...but you get the point.  We went from this....
To this!
Such a huge transformation.....and so easy to do!  You can be sure...that chest in the back is getting a makeover too.  :)

Have a great weekend!

Paula


Monday, October 24, 2016

Painting Brass - Try A Chandelier

Awhile back, my sister-in-law (and very dear friend) brought me a brass lamp to paint.  I want you to know, you can paint almost anything you have at home and make it beautiful.  So don't throw away those old brass lamps!
I painted this using Annie Sloan Chalk Paint - which you don't have to use...but because this is a paint that adheres without priming, it was my paint of choice.
I painted this a french linen with some old white added to it.  Then I used some clear and dark wax.
The end result is a very soft lamp with a warm look.  
This was the lamp drying in a corner of my house, but I'm sure it is going to look great above the dining room.  It almost looks and has the texture of wood.  Pretty!

Have a great week!

Paula


Monday, October 17, 2016

Mackenzie-Childs Chest - with Knobs

Awhile back, I was working on a chest I called Alice In Wonderland.  You can see the whole post right here.  Several of you have reminded me that I have not posted the completed chest with the new knobs.   You are correct....so here you go!  Here is the completely finished piece.

Didn't she turn out great?  This has to be one of my all time favorite pieces.  This chest sits with a view of a fabulous lake behind it in SC.  The fish knobs are just perfect!


I'm working on a few more Mackenzie-Child's inspired pieces that I will be posting soon.  I hope you are eating lots of apple pie and enjoying this fabulous fall weather!


Paula


Monday, September 19, 2016

Tis The Season To Paint Pumpkins


"let us always meet each other with a smile, as the smile is the beginning of love."
                                                                                                ~mother teresa


Smiles,

Paula


Sunday, September 18, 2016

September......It's Pumpkin Time

Get creative and make the most beautiful pumpkins ever!  I did these for a friend awhile back and these might be my favoites!

Happy pumpkin painting!

Paula


Thursday, June 2, 2016

New Look On An Old Dining Room Set

I have had this old dining room set for almost 30 years.  It was one of the first pieces of furniture my husband and I bought when we first married.
I've kept it for years and since we are in a home transition, it is now our go to eating table. But ya know.....it just doesn't fit and hasn't fit....with where we are today.  So why not paint it?  Right?  Paint can pretty much transform anything and you don't have to be afraid of it.
I sort of had a plan (haha sometimes I change as I go).  I love the coco color from Annie Sloan. It's probably the closest color with brown tones in it and reminds me of hot chocolate.   I gave my table a little "scuff" with sandpaper only because my finish was so slick and shiny.  A little scuff will allow the paint to adhere better.  Don't worry about complete coverage your first time through.  Just make sure you go from left to right and make a complete swipe from end to end on your last paint stroke.  This will help minimize your brush strokes in the middle of the table.  Then let the paint self level.  Let it dry.
Now, if you have a leaf or extra part to your table....now is the time to pull that out, put it in and paint your whole table at one time.  Do not try to do this later...... :(

Then I painted the chairs a mixture of half pure white and half old white.  It's a pretty white without too much ivory.  
But when I put the chairs next to the table, they were too.....plain for me.  I like a little "sprinkles" with my neutrals (you know a little extra something).  
So I did a coco wash and put this on the chairs over the white.  It brought the chairs to life and gave them a warm feel to match the coco table.  
I also thought the table was a little plain, so I added an outline with gold gilding wax.  This is such an easy thing to do and it added just the right little bit of umph!
As much as I love Annie Sloan paint, I am not a fan of the wax on large surfaces.  That's ok... You don't have to wax.  You can put a water based polycrylic over this and it will be beautiful! That's what I did.  I got a clean smooth finish on a table that will see lots of grease and food and the finish makes me happy.  That's what's important.  YOU have to like it.  If you don't like a wax finish, you have options.  ;)  I did wax the chairs as I like a waxed chair finish.  Just not large surfaces.  
It's so pretty and works so much better in our little space that I can't believe I waited so long to do this.  Next, I will be covering the chair pads.... stay tuned.  
Don't be afraid to tackle what you think is a big job.  This was so much easier than you might think.  

Have a great week.

Paula

Friday, April 22, 2016

Painting Outdoor Pots

I know I've been off the grid lately, but sometimes we all need a break right?  Thank you to those that have sent emails asking where I am and if everything is ok.  Everything is great!  Back to some new projects.  

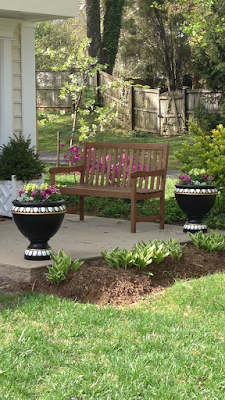
I had two of these pots sitting at my mom's house for awhile.  I got them at Lowe's years ago.  They are heavy and made out of clay.  I was looking at them one day and thought they could be so much cuter with a little paint :). Why not right?  We paint everything else......When painting pots you need to make sure you get a paint that will adhere.  Sometimes you have to do a little test patch.  Not fun, but it will save you time in the long run.  
I went to Michaels and found a paint that would stick to all types of surfaces including clay.  It's a Folk Art brand.  I painted these all over with a shiny black so my accent colors would pop.
Then I added some white and gold.
Once completed, I gave these a good spray with Minwax Helmsman Spar Urethane so that they can be protected in the sunlight.
They make me happy when I pull in the driveway.  So go ahead and paint some pots.  Add some "sprinkles" to your yard.  

Paula