Thursday, August 31, 2017

Fabulous Brown Chairs get Makeover

 My friend asked me to "do something" with these chairs....  
Like a lot of older and antique chairs, the dark brown wood just doesn't fit into our lives today. This must have been an awesome dining table in its day because the carvings and detail were pretty amazing.  

When working on older chairs, know that if they are mahogany, or if a deep stain was used, it will probably bleed through your chalk paint.  It's a simple fix.  Before painting or even trying to paint dark furniture like this, give it a quick spray of shellac.  This will seal the stain and you can get on with your painting quickly.

I started with an ivory color and then added touches of pinks and a very soft green.  Gold paint and gilding wax gave it the glitz it needed to bring out the detailed carvings.
Such a pretty transformation.  <3

Have a great week!

Paula

Monday, August 7, 2017

Little Round Table Gets a McKenzie-Child's Update - And A New Name

A friend of mine had this little round table that she asked me to paint.  I just loooove me a small round table!  I think round tables break up a room and add so much character.  This little table was chalk painted and was cute.....but with a few changes I knew she was going to be fabulous!
My friend's new color scheme incorporates lots of blues.... To start with, I painted this table in a rich navy.  I used General Finishes Milk Paint for the first time and I have to say - I love the paint.  It went on very smooth, had a wonderful texture and provided great coverage.  I will definitely be using this again. And....it's cheaper than Annie Sloan Chalk Paint.  The original top was a plain white - but in order to be fabulous, we needed to add some real character (checks) and then some gold highlights.
I apologize that I don't have very many before and during pictures, but you can see the transformation from the picture at the top to the one here at the bottom.
A nice semi-gloss finish and this pretty lady is ready for her new name.  I've decide to call this one "Lady Sings The Blues".  I think it's fitting.   She went from cute....to fabulous in just a few days.

Happy Painting!


Paula


Sunday, June 11, 2017

Nana Lucy - Corner Hutch Makeover

My husband's Nana Lucy gave us this corner hutch a looong time ago.  Somehow, it has worked and blended in our family background without much thought.  Hubbie was adamant, that Nana Lucy (as I call the hutch) was staying put in all her mahogany/cherry stain splendor.  I have wanted to paint her for years...but I was told that this was "off-limits" to my painting creativity.
Take a look at Nana. You all get what I'm talking about, right?  We moved to a new home and the one thing that just didn't fit anywhere in the house was...Nana.  So I begged and pleaded that I be allowed to do something with her or - she was going to have to go in our bedroom.  (haha)

So first things first.  Off with the scrolled piece up top and off with the decorative detail on the glass.
I painted the inside an ivory and the outside a duck egg. Still a bit plane, I added some cool rubber adhesives that look like wood.
These cool little rubber adhesives, break up the piece and add texture.  The side pieces are wood molding that I cut and glued to the piece. 
Then I distressed her and added both clear and dark wax.  The dark wax, really darkened the color, which is what I wanted.  
With some McKenzie knobs, Nana has turned into my wine bar (please don't judge :). And now, I enjoy seeing her every day.  
What good is an heirloom if you can't enjoy it?
I know Nana Lucy would just love this!  I've got MC knobs ordered for the bottom too.  Then she will be complete!

Do you have an old piece of furniture that you really don't enjoy?  Paint it, strip it, change it - so you love it!

Have a great week


Paula

Tuesday, April 25, 2017

Small House Big Love - Kitchen Makeover

We recently bought an old cape cod style home and were excited to do some renovations, bring it up to date and make it our own.  We bought it knowing...that the house needed some Big Love in order to make it work for us.

Both of us love to cook and when we first saw the kitchen we were a little unsure of how we would turn this into something we loved.  Neither of us had ever done a renovation before.  Fortunately, we have some great friends who are experienced with this type of work and they were more than happy to walk us through the process and offer advice when we were... freaking out.  
The kitchen was very small and closed off to the rest of the house.  So we decided to take out a wall between the kitchen and the dining room.  Fingers crossed that there weren't any pipes behind them. 
That would have been a major bummer.....and thankfully - there were none.
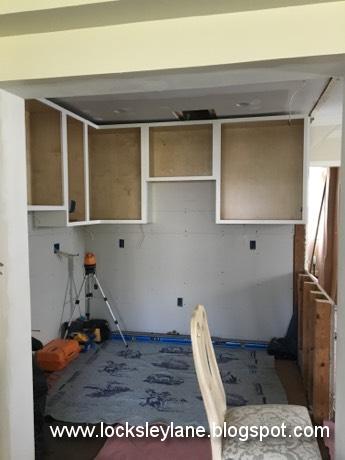
Seeing the open space was pretty exciting.  But honestly....I was really thinking "dang....it's still going to be a very small kitchen."  I never said anything to anyone but at this point I was kind of thinking... "uh oh.....what did we do buying such a small place that needs so much work?"  Pressing onward, I was committed to the process and wasn't going to let negativity or lack of certainty bring me down.

It takes awhile to order cabinets so I picked out what I wanted and had them ordered as soon as we could map out the space we had available. I knew I wanted a white kitchen. With such a small space, I wanted the kitchen to look as open as possible.  
I chose white shaker cabinets and white beveled subway tile.  At this point, my husband is asking for cherry cabinets and tan or "green" counter tops (yup...he's the adventurous one). He thought the white would be too sterile and lack personality.  Now, we used a white tile in our new master bath with black grout (I will show you that in another post) and thought that maybe a colored grout would soften things up a bit. We chose a color called "oyster gray" and really like how it turned out.  
Up went the cabinets, appliances and the counter tops.


In went the faucet and the tile.
Before we knew it, we had a brand new beautiful kitchen.

It was fun to take a space that had seen better days and turn it into something that works for us.  We love how it turned out and can't wait to start cooking!

I have quite a few more things to show you....stay tuned.

Have a great week.

Paula


Thursday, April 13, 2017

Spring Pots Should Make You Happy

Hey everyone!  I've been so busy these last few months working on lots and lots of fun things to show you.  I needed a break to focus on a few other things and will begin to post as I complete each of my projects.

With the weather getting warmer, I'm all about having pretty flowers around.  They just make me feel good.  You don't have to have a lot of them, just a couple, placed strategically so you can see them when you are out and about.

You don't have to buy expensive pots either.  You can buy inexpensive pots and then make them your own. Spring pots don't have to be boring......you can jazz them up!

This was a simple black pot that I spray painted with an all surface white paint and then added colors that would adhere and last outdoors.  Look for paints in any hobby store marked for all surfaces.

Then create away!  This pot is so pretty it makes me smile every time I walk by.

Happy planting!

Paula


Wednesday, February 1, 2017

Painting Ceramic Plates

Have you ever looked at decorations but just can't find the right colors or pattern? Try painting ceramic plates. 

Ceramic plates are easy to paint, and you can be as creative as you want with them.  Plates are a beautiful way to bring your kitchen to life.  And, they make a huge statement in your every day decor. Your options are endless.

I started with these two large ceramic plates and treated them with a good primer.  Then.... based on the client instructions to "be creative" with pinks and yellows....I did just that. 
You can keep your design simple or go all out.  Once painted, I sealed them with a polycrylic.


Look how beautiful these plates are sitting on that precious table beside the water and their beautiful chairs?  Don't you want to just sit there?  I know I do.....all day long.  And night too!
Don't be afraid to customize pieces to fit your home.  Make it work for you.  It's so easy!  If I can help, let me know.

Have a great week!

Paula


Tuesday, January 10, 2017

Little Pink Fish Cabinet - Mackenzie-Childs Like

With a little paint and creativity, this plain little old white cabinet transformed itself into the cutest little pink fish cabinet!
A friend of mine had this little white chest sitting around.  She asked me to do something Mackenzie-Child's like but asked that I use pinks and yellows.  As I pushed for a little more direction, she said "I don't care, be creative."  Sometimes that is a good thing and other times....that means I have to really think about a piece and think about where patterns and colors need to go.  Mapping out a piece - especially when you have a lot going on is helpful. 
After I painted this piece all white -  I began painting checks on top. That was my focal point.  Then I made sure the colors were working together and that my sizing was proportionate.  
Then I started to map out the sides, drawers and other details.  
The piece really looked pretty even with its plain knobs.... but once the fish knobs were added - this went to a whole different level of cute!

We took a little white chest from its plain old boring life and transformed it into a truly whimsical and fun piece of furniture.  

If you have a plain little white piece of furniture, don't be afraid to transform it.  You'll be amazed at what you can do with it.

Have a great day!

Paula